


Ultimate Lost Lands 8 Walkthrough
Adventure, danger, and mystery all return in Lost Lands 8: Sand Captivity. For those seeking a detailed and spoiler-free Lost Lands 8 walkthrough, this guide delivers step-by-step solutions for puzzles, hidden object scenes, and chapter quests from beginning to end.
With so many twists, hidden areas, and inventory-based challenges, it’s easy to get lost — but with this walkthrough, you’ll never miss a collectible, morphing object, or important clue.
What is Lost Lands 8: Sand Captivity?
Lost Lands 8: Sand Captivity is the eighth entry in the wildly popular adventure puzzle series developed by FIVE-BN Games. The game combines immersive storytelling, challenging puzzles, and exploration with vibrant visuals and eerie music.
Set in a new desert-themed environment, Lost Lands 8 follows Susan as she journeys through cursed sands, buried secrets, and ancient civilizations to rescue those who have vanished.
It’s a brilliant blend of logic, adventure, and emotional storytelling — perfect for newcomers and veteran fans alike.
The Storyline of Lost Lands 8
In Sand Captivity, Susan is called back to the Lost Lands when an ancient artifact malfunctions, unleashing a powerful force that begins to turn entire regions into sand-covered wastelands. Friends and strangers vanish into the sand, and it’s up to Susan to restore balance.
The story explores themes of corruption, betrayal, sacrifice, and restoration. Players will uncover buried temples, unlock sealed tombs, and eventually face an enemy born of the very desert that seeks to consume the world.
Meet the Heroes and Villains of Lost Lands 8
-
Susan: The main protagonist once again, older and wiser, with her emotional arc deepening.
-
Maaron: The returning mage offering guidance but hiding his own guilt.
-
New Antagonist (Zarhak): A cursed guardian who’s been resurrected and now controls the sands.
-
Isandra: A mysterious desert nomad who helps — but also misleads.
Each character brings a vital piece to the narrative puzzle, making your interactions as strategic as your inventory management.
Strategies to Beat Every HOP in Lost Lands 8
Each Hidden Object Puzzle (HOP) includes multiple layers:
-
Zoom function – Use it to explore shadowed corners.
-
Item pairing – Some objects only appear after using others (e.g., using a brush to reveal a carving).
-
List-to-image puzzles – Switch modes if stuck; sometimes image-based mode is easier.
HOPs often reward you with tools, gems, or scrolls needed for major puzzles.
Step-by-Step Puzzle Solving for Lost Lands 8
From rotating statues to sequencing ancient glyphs, Lost Lands 8’s puzzles demand focus. Here’s a general strategy:
-
Always look for patterns in symbols (some puzzles repeat styles from previous chapters).
-
Use your journal — it auto-records clues you discover.
-
Pay attention to color and shape – especially in crystal and mirror puzzles.
Puzzle walkthroughs for each chapter are listed below.
Chapter 1: The Temple of Winds – Beginning Your Sand Captivity Journey

As you boot up Lost Lands 8: Sand Captivity, the wind-blown sands swirl and you find yourself standing before the Temple of Winds — a grand yet crumbling structure half‑buried in dunes. This is where your journey begins.
Your first move? Explore the temple’s exterior with care. Begin by scanning the ground near the towering stone columns: there you’ll discover a Broken Compass under a pile of sand and debris. Don’t worry — that’s expected. Collect it; it’s going to be vital soon. Also, click around near the cracked fountain to find a Sun‑Disk Fragment, hinting that something needs reassembly.
Repairing the Compass & Unlocking the Inner Gate
Once inside the vestibule, look at the altar — you see gears littered around. Open your inventory, select the compass, and combine it with the three small gears scattered on the altar’s stone base. The repaired compass will point towards a glowing panel on the gate to your left. Slot the compass there — the gate creaks, revealing a hidden chamber beyond.
Solving the Sun/Moon Tile Puzzle
Before stepping through, notice the circular floor mosaic: sun and moon tiles scattered randomly. This is your first major puzzle. You must arrange the tiles so that suns and moons alternate in a perfect circle. The hint lies in the faded inscription carved on the wall: “Where light meets dark, balance opens the path.” So place sun–moon–sun–moon as you go around. Once correct, you hear the tiles click, and the hidden passage opens.
Inside: First Hidden Object Scene & Collectible
Inside the chamber, torches flicker revealing broken furniture and scattered relics. A hidden object scene begins. Items to find include:
-
a Rusty Hammer (half-buried under rubble),
-
a Gem Shard tucked inside an old clay chalice,
-
and a Scroll Fragment hidden behind a loose brick.
Use the hammer to break open the rusted chest lying in the corner — inside you’ll find the Temple Key. Before grabbing it, though, glance toward the statue at the far end — behind its left eye socket hides your very first Morphing Object. This fleeting little treasure is easy to miss — so take your time and double‑click on suspicious statue parts.
Preparing for Descent: Key in Hand
With the Temple Key secured, approach the heavy stone trapdoor at the chamber’s center. As you slot the key, the floor rumbles — a descent awaits. Save your game now if you can: what lies below begins Chapter 2. With that, Chapter 1 ends — you’ve unlocked the gate, repaired the compass, solved your first puzzle, collected your first morphing object, and taken your first step deeper into Sand Captivity.
Chapter 2: The Subterranean Labyrinth – Darkness, Sand, and First Trials

The trapdoor slams shut behind you, and the world goes dark. Torches flicker to life slowly — your descent into the Subterranean Labyrinth begins. This section mixes claustrophobic passages, shifting walls, and puzzles that test your logic under pressure.
Turning on Light & Finding the Map Fragment
First thing: grab the Torch leaning against the wall to your right. You’ll need it immediately — visibility is painfully low by default. A few steps forward you notice a faded map fragment pinned under rubble. Take it — it shows a rough layout of the labyrinth. Helpful, yes — but incomplete. You’ll gather the rest later.
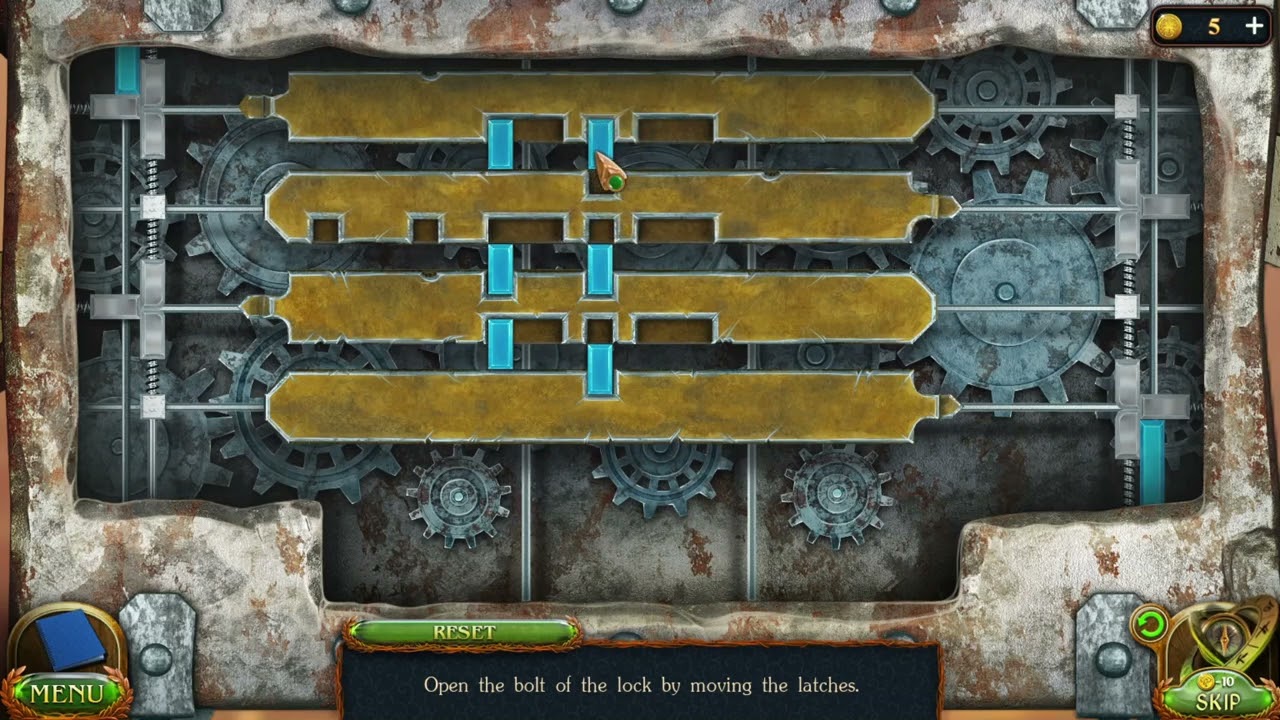
Corridor Puzzles – Pressure Plates & Symbol Locks
The first corridor you enter has pressure plates on the floor. Stepping randomly triggers traps. Use this method: avoid pressure plates until you spot sand-colored tiles — they’re safe. Step only on safe tiles; once you clear the corridor, a locked door awaits.
The lock isn’t simple: it’s a symbol combination puzzle featuring ancient desert glyphs — an eye, a star, a wave, a sand swirl. Use the map fragment's margin sketch to find the correct order: eye → wave → star → sand swirl. Set them, and the door unlocks.
Hidden Object Scene — The Relic Room
Beyond the door lies a dusty chamber filled with relics and crumbling statues. A second hidden object scene begins — this time with more objects than before. Items to locate:
-
Ancient Coin (on a pedestal),
-
Shattered Hourglass (on the floor near a column),
-
Metal Rod (hidden inside a sarcophagus corner).
Use the metal rod to pry open a rusted grate near the wall. Behind it lies the Labyrinth Key — necessary to move deeper. Also, glancing at a broken wall carving reveals your second Morphing Object — this time a flickering lizard carving.
Escape the Labyrinth — Mini‑Game Time
Backtrack with the key, then head through the tunnel to a large stone door sealed by a rotating pillar puzzle. Each pillar has runes; you must align them so that the top runes spell “SOUL” and the bottom runes spell “SAND.” Rotate each pillar accordingly and slide in the key — the door swings open.
Light floods the corridor as doors around you close. You’ve made it through Chapter 2. You emerge onto a desert plateau — sun, wind, and open sky after darkness. Take a breath — the real journey continues.
Chapter 3: Desert Plateau & The Oasis — Sandstorms, Secrets & Hidden Wonders

Stepping out from underground, you’re greeted by a vast desert plateau under a scorching sky. Dunes stretch as far as you can see. Hot winds threaten to knock you off your path. Chapter 3 is all about landscape puzzles, environmental hazards, and your first brush with shifting sandstorms.
First Steps – Gathering Supplies & Braving the Heat
Your compass (repaired earlier) now helps you orient. Head east — you’ll spot ruins of an old well near a sandstone arch. Before advancing, gather these critical supplies:
-
Empty Flask near the well — refillable at the oasis (if found).
-
Torn Cloth from the arch — useful against sandstorms.
-
Sturdy Rope tied around a broken post — for climbing dunes or crossing gaps.
These might seem small now, but you’ll be glad later.
Hidden Object Scene at the Oasis Ruins
A short walk reveals a near‑dry oasis surrounded by broken pillars. A hidden object scene triggers: objects are scattered among rubble, sand, and water basins. Look carefully for:
-
a Bronze Key (half‑buried in sand),
-
a Glass Vial (floating in stagnant water),
-
a Stone Tablet Fragment (leaning against a pillar).
Using the rope and flask → climb down a shallow well shaft hidden beneath sand (use “rope + empty flask” sequence). Inside, retrieve the Ancient Seal, needed to open the desert tomb ahead. Also grab the Oasis Tablet Fragment — you’ll need to assemble all fragments later.
Surviving the Sandstorm — A Navigation Puzzle
A ferocious sandstorm kicks up suddenly — screen blurs, visibility drops to near zero. Pause the game if you must, then open the map. The map shows faint outline of a rock path behind drifting dunes. Using the compass and map, follow the faint rock markers. Wrong turns lead you back into dunes — and possibly to your death (character becomes exhausted).
This is less of a puzzle and more of a test of patience and observation: move slowly, avoid sand drifts, and keep your compass steady. After a few tense minutes, you reach the Desert Tomb marked on the map.
Desert Tomb Entrance – First Major Interactive Puzzle
At the tomb entrance, a large door locked by an Ancient Seal Mechanism awaits. Insert the seal — but the door doesn’t open yet. Surrounding pillars have four glowing glyphs. Your task: touch the glyphs in the correct sequence — water → sun → crescent → star — matching the order of oasis basin data from the tablet fragment you gathered earlier.
As you touch them in the right order, the door grinds open, revealing a dark corridor ahead. Carefully step inside — that completes Chapter 3. You’ve survived heat, storms, hidden object challenges, and your first real outdoor environment.
Chapter 4: Tomb of Whispers – Secrets, Echoes, and Ancient Warnings

Entering the Tomb of Whispers, you’re submerged in silence — the only sound is your breathing and distant echoes of shifting sands above. Chapter 4 deals with ancient lore, narrative puzzles, and mysteries that deepen the main plot.
The Whispering Corridor – Audio‑Clue Puzzle
The tomb corridor has several doors; one seems slightly ajar. As you approach, whispers echo — but only when you’re standing exactly in three marked tiles on the floor (they faintly glow if you pay close attention). Step on each in sequence: left → center → right — you hear whispers more clearly, giving hints about what lies behind each door (e.g. “seek the light”, “shade hides truth”, “blood marks the path”).
Take note. You’ll need the “shade” and “light” hints soon.
Hidden Object Scene in the Crypt Chamber
You reach a crypt chamber filled with urns, broken coffins, and ancient relics. A hidden object scene begins: locate the Golden Dagger (on a sarcophagus lid), Iron Bracer (among broken helmets), and Silver Seal Ring (inside a cracked urn).
Use the dagger to pry open a coffin; inside find the Scroll of Prophecy — the first time you get major storyline info. Also inside is a second Morphing Object, looking like a flickering scarab emblem.
Decoding the Prophecy – Logic Puzzle
Open the Scroll of Prophecy in your journal: it contains a riddle — “When light meets shade, the path diverges; where seal and bracer unite, the tomb divides.”
Now go back to the corridor doors mentioned earlier. Based on the riddle and tiles’ whispered hints:
-
Use the Silver Seal Ring on the left-hand door (shade);
-
Use the Iron Bracer on the right-hand door (light).
Inside the ring‑sealed door, you find a secret chamber with a Mosaic Panel Puzzle: arrange colored tiles to recreate an image of a floating city over golden sands. Once solved, a hidden wall slides open revealing the Sun‑Crest Amulet Fragment — a powerful artefact piece.
Exiting the Tomb & Preparing for the Next Stage
Before leaving, make sure to grab the Bronze Key from the secret chamber (if not yet collected — sometimes hidden behind mosaic dust). That key unlocks an ancient gate leading upward — the path to the last revealed region on your map: the Desert Citadel.
As you step out of the tomb, torchlight fades; you squint against the bright sun. With the Sun‑Crest Amulet Fragment in inventory and secrets in your mind, Chapter 4 closes — but the story is just heating up. You’ve gathered lore, cracked puzzles, and collected critical artefacts. Now, onward toward deeper mysteries and grander challenges.
Chapter 5: Through the Jungle Ruins & Into the Stronghold

After escaping the tomb and retrieving the Sun‑Crest Amulet Fragment, you emerge into a dense jungle surrounding ancient ruins. The overgrown foliage and crumbling stonework hide secrets — and danger.
-
First, explore around the ruins for important tools. There’s usually a Gardening Scissors hidden in overgrowth near a pond. Use the scissors to clip vines covering a broken crate: inside you’ll find a Rusty Key. This key unlocks the ruined gate leading toward the stronghold known on the map as the Stronghold of the Five Worlds.
-
Once inside the stronghold’s outer courtyard, you’ll face a colored‑chips puzzle (a grid based puzzle). The solution follows a pattern: no repeated colors or numbers per row/column. One known correct grid arrangement is:
-
Row 1: Blue‑1, Green‑2, Purple‑5, Red‑10, Yellow‑25
-
Row 2: Yellow‑2, Blue‑5, Green‑10, Purple‑25, Red‑1
-
Row 3: Red‑5, Yellow‑10, Blue‑25, Green‑1, Purple‑2
-
Row 4: Purple‑10, Red‑25, Yellow‑1, Blue‑2, Green‑5
-
Row 5: Green‑25, Purple‑1, Red‑2, Yellow‑5, Blue‑10
Solving the chips puzzle opens a hidden passage deeper into the stronghold. Inside, you can collect a Crystallized Core — a key artifact needed later in the story — and the next morphing object (often flickering near a broken statue or pillar).
As daytime turns to dusk, the stronghold’s inner halls grow darker. Make sure to use torches or equivalent light sources to avoid traps and hidden dangers. Once you clear the stronghold courtyard and acquire the core and morph, the game transitions toward the magical section — the “Academy of Magicians.”
Chapter 6: Academy of Magicians & The Greenhouse Mystery

Entering the Academy of Magicians, the tone changes: magic, mystery, and alchemical puzzles replace ruins and wilderness.
-
Immediately after arrival, head to the courtyard greenhouse door. There’s an interactive door‑mechanism puzzle involving colored butterflies. You must click butterflies in a specific order to unlock the door. The puzzle unlocks access to the greenhouse labs.
-
Inside the greenhouse, you’ll find components for crafting an Underwater Potion. This potion is essential for an upcoming underwater sequence deeper in the game. To make it, gather Seaweed, Herbal Extracts, and Crystal Dust from various lab benches and submerged containers. Once combined, the potion opens a submerged hatch leading to hidden catacombs under the academy grounds.
-
As you progress, you’ll come across a mini‑game puzzle involving rearranging model parts — solving this gives you a Magical Emblem, a crucial item for later gate mechanisms.
-
Also be sure to collect morphing objects and hidden collectibles throughout the academy — many are essential for 100% completion and unlock special inventory items for final chapters.
Once the underwater potion is brewed and the emblem obtained, escape the catacombs and prepare to move on toward the final region — the desert citadel — with your magical tools in hand.
Chapter 7: Journey to the Desert Citadel—Trials and Final Preparations
With artifacts — the Crystallized Core, Magical Emblem, Sun‑Crest Fragment — assembled, you set out for the Desert Citadel, the ultimate stronghold of sand and ancient magic.
-
On the way, cross a hazardous desert area where navigational puzzles and environmental obstacles test your patience. Storms might obscure paths — use your compass and map to stay on course. This journey reminds us that the game combines Hidden Object + Puzzle + Adventure in equal measure.
-
Once at the citadel gate, you’ll face a large multi‑step lock puzzle: combine core + emblem + fragment, then interact with celestial glyphs in the correct order (sun → star → crescent → moon). This opens the gate to the citadel’s heart.
-
Inside the citadel, hidden‑object scenes and mini‑games are more frequent and complex. Carefully explore libraries, ancient armories, and magical labs. You may find Ritual Scrolls, Crystal Shards, and a final Morphing Artifact — vital for ending sequences.
-
Be aware: using hints too liberally may cause you to miss certain collectibles. For full completion, try to solve puzzles manually, and double‑check every interactive scene.
This chapter sets the stage — once inside the citadel, the final confrontation looms. Ensure all key items are collected before proceeding.
Chapter 8: Final Battle & Sand Curse – Salvation of Loved Ones

This is it — the climax. All your efforts lead to this moment, as you confront the curse and work to bring loved ones back.
-
You enter the Ritual Chamber deep in the citadel. A large circular sigil lies on the floor. Place your three major artifacts: Crystallized Core, Sun‑Crest Fragment, and Magical Emblem into their designated slots. This triggers a ritual that will attempt to reverse the sand curse.
-
Once activated, the final confrontation begins: a combination of interactive puzzles and a mini‑game — you must complete a series of glyph alignment puzzles under time pressure. Each solved glyph weakens the curse. Mistakes slow progress.
-
After glyphs are aligned, a cutscene triggers: the sandstorm clears, curse energy dissipates, and you see a vision of your loved ones being saved. The environment transforms — the desert citadel blooms, the sand recedes. You’ve succeeded.
-
If you have collected all morphing objects, hidden collectibles, and bonus items, a final Epilogue Scene unlocks — bringing closure to the story and rewarding you with a special gallery portrait or bonus lore.
Congratulations — you complete Lost Lands 8 with redemption, closure, and the sense you’ve truly saved more than just one world.
Lost Lands 8 Frequently Asked Questions
Could you please let me know the estimated time required to complete Lost Lands 8?
The main story takes approximately 5–6 hours to complete, while a 100% completion requires 7–8 hours.
Can you replay the bonus chapter?
Yes, once unlocked, it appears in the main menu.
Is it necessary to play previous games?
Not strictly, but playing earlier games gives emotional depth and background.
Do choices really matter?
Yes. Your actions in Chapter 6 lead to one of two possible endings.
Are there any secret puzzles?
Yes. One appears in the bonus chapter if you collect all Desert Sigils.
Wrapping Up the Lost Lands 8 Walkthrough
Lost Lands 8 isn’t just another point-and-click adventure — it’s a rich narrative filled with mystery, symbolism, and emotional choices. Whether you’re chasing morphing objects or solving ancient riddles, this Lost Lands 8: Walkthrough ensures you won’t miss a thing.
 The Economic Frontline is a knowledge-driven platform offering thoughtful economic perspectives, policy-focused, and analytical content on national and global financial trends.
